Installing the JDK on Windows

First download the current Java 8 SE Development Kit.
Choose the Windows x64 edition and save it to a temporary folder on your server.
Installation
- Create the folder C:\Program Files\Oracle Java JDK on your server.
- Start the installer by double-clicking the downloaded .exe file.
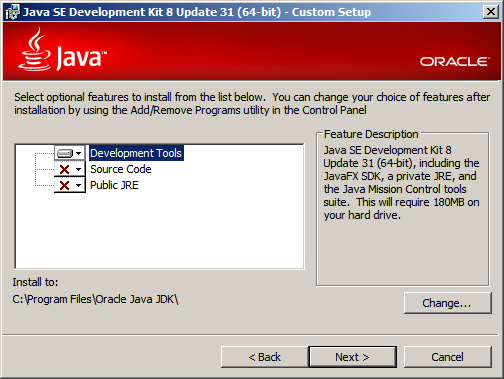
- Click Next. Select Development Tools and set the "Install to..." location to be the folder you created above.
- Untick Source Code and Public JRE. We don't need these.
- Click Next to start installing.

Set JDK_HOME Environment variable
Finally we need to set an environment variable to point to our new Java installation:
- Open the control panel and choose the system applet
- Click the Advanced tab and the button Environment Variables
- Click New... at the System Variables
- Use JDK_HOME as the name of the variable and the path C:\Program Files\Oracle Java JDK as the value.
- Finish by clicking OK until your are back at the control panel.
Or using the command line:
setx JDK_HOME "C:\Program Files\Oracle Java JDK" /m
To check the environment variable has been set correctly:
- Open a new command prompt, type set and hit enter
- Scroll until you see the variable JDK_HOME
Update
It is important to keep Java updated with the latest security patches. To do so simply download the latest installer, Stop your Tomcat-Service and install the new version over the old one. Don't forget to re-start Tomcat after the update.
Silent Installation
If you need to install this product on several servers then a silent installation will make your life easier:
jdk-8u31-windows-x64.exe /s addlocal="ToolsFeature" installdir="C:\Program Files\Oracle Java JDK"
setx JDK_HOME "C:\Program Files\Oracle Java JDK" /m
